2012年12月22日土曜日

言語C でスコープドポインタを実現する(その4)

リファレンスの生成

リファレンスの生成は次のように行っている。
Reference NO_INSTRUMENT new_Reference(void* object,
 void (*destructor)(void* object))
{
 Reference this = (Reference)malloc(sizeof(struct Reference));
 if (this != null) {
  this->object = object;
  this->frames = frames;
  this->referenceCounter = 1;
  this->destructor = destructor;
 }
 add(this);
 return this;
}
ヒープ領域からメモリを割り当て、オブジェクトとデストラクタ、framesを記憶し、参照カウンタは1で初期化する。
この実験コードでの framesはグローバル変数であり、複数スレッドに対応していないが、マルチスレッド化するときには framesは TLSに配置される予定である。その場合、Referenceがどの framesに対応しているか素早く探すためのものである。
TLSからキーで検索するならこれは不要である。

つぎに生成したリファレンスを framesに登録するために add関数を呼ぶ。
メモリ割り当てに失敗したときにも addししまうのは暫定のためである。
再帰呼び出しされる関数の中でリファレンスが作られるなら、単純に if文の中に入れれば良いと言うわけにはいかない(復帰時に他の階層のリファレンスを破棄する恐れがある)ので、何らかの配慮が必要になる。

その add関数はつぎの通り。
private void add(Reference r) {
 int top = ArrayList_size(frames) - 1;
 Frame frame = ArrayList_get(frames, top);
 ArrayList_add(frame->references, r);
}

framesリストの先頭にある frameリストを取り出す。
frameリストにリファレンスを追加する。

framesと frameの各リストの構造を(その2)の例題 testAutoCollectを例に図式化すると次のようになる。


洗濯機が貰えるなら僕らもノーベル賞取ろうよ。

言語C でスコープドポインタを実現する(その3)

関数から復帰するとき

前回の使用例のように関数から復帰するときの処理について紹介する。
gccのフック機能を利用してつぎの処理を行う。
void NO_INSTRUMENT __cyg_profile_func_exit(void* functionAddress,
 void* call_site)
{
 if (!suppressed) {
  suppressed = true;
  popFrame(functionAddress);
  suppressed = false;
 }
}
関数呼び出し時同様、自身のトレースを行わないようなフラグ処理を行う。
(ただし、マルチスレッド未対応)
関数呼び出しに対応したフレームをポップする。

popFrameはこんな感じ。
private void popFrame(void* functionAddress) {
 boolean done = false;

 while (!done && ArrayList_size(frames) > 0) {
  int top = ArrayList_size(frames) - 1;
  Frame frame = (Frame)ArrayList_removeAt(frames, top);
  done = (frame->functionAddress == functionAddress);
  Frame_finalize(frame);
 }
}

framesリストの新しいものから順に現在の関数名が現れるまで、古いフレームを捨ててゆく。
こうすると、途中に -finstrument-functionsを指定せずにコンパイルされた関数があってもポップが正しくできる。
また、最低1つはポップ済みのため、関数を再帰的に呼び出しても処理できる。
再起呼び出しの中で以前紹介した例外機構や longjmpによる脱出にも対応可能である。

ただし、落とし穴もある。
-finstrument-functionsを使っていない関数に復帰しただけではすぐに解放処理が行われない。
再起呼び出しにより同じ関数を通ったとしても、条件分岐により catchしたりしなかったりした場合に正しくポップされるかは未だ考慮されていない。
関数アドレスではなく、現在のスタックフレームを比較する必要があるかも知れない。

2012年10月5日金曜日

言語C でスコープドポインタを実現する(その2)

新しい参照の作成

ローカル変数として参照を作成するときはつぎのようにする。
 lwd_Reference r = new_lwd_Reference(new_C("3345g"),
  (void (*)(void* object))C_finalize);
参照を生成するとき、第1引数としてオブジェクトのポインタを、第2引数にそのオブジェクトのデストラクタを指定する。

構造体やクラスのメンバが参照の場合も同様に初期化できる。

関数から復帰時に自動的に解放されるオブジェクト

スコープドポインタとしての動作を確認する例を示す。
テストに使用する簡単なクラス Cはつぎのようなもの。
/****************************************************************
 test target C
****************************************************************/

static boolean cFinalized;

typedef struct C* C;
struct C {
 char* string;
};

C new_C(char* string) {
 C this = (C)malloc(sizeof(struct C));
 if (this != null) {
  cFinalized = false;
  this->string = strdup(string);
 }
 printf("C object created.\n");fflush(stdout);
 return this;
}

void C_finalize(C this) {
 if (this != null) {
  printf("C object finalized. %s\n", this->string);fflush(stdout);
  if (this->string != null)
   free(this->string);
  free(this);
  cFinalized = true;
 }
}
コンストラクタとデストラクタがあるだけだが、デストラクタが実行されると外部変数の cFinalizedを trueにセットする。

テストケースはつぎの通り。
static void function0() {
 reference r = new_reference(new_C("3345g"),
  (void (*)(void* object))C_finalize);

 Assert_false("まだ削除されていないはず。", cFinalized);
}

void testAutoCollect(TestCase testCase) {
 Assert_false("まだ削除されていないはず。", cFinalized);
 function0();
 Assert_true("削除されているはず。", cFinalized);
}
testAutoCollect関数から呼ばれた function0関数の中で、参照 rを生成する。
関数復帰直前に cFinalizeは未だ falseであるが、testAutoCollect関数に戻ってきた後は cFinalizedが trueになる。

実行すると、標準出力にはつぎが出力されている。
[CUnit] ./ReferenceTest: testAutoCollect
C object created.
C object finalized. 3345g
デストラクタを明示的に呼んではいないが、トレースログにはデストラクタが呼ばれている様子がわかる。

2万円以上のカードをパスケースに入れて改札機にタッチしますと他のカードが処理されることがあります。 -- それは不思議な現象だ

2012年9月30日日曜日

言語C でスコープドポインタを実現する(その1)

gccの拡張機能に頼ることになるが、finstrument-functions機能を使用すると、スコープドポインタもどきが作れる。
これは、関数が呼び出されたときと復帰するときに、2つの特殊な関数
  • void __cyg_profile_func_enter(void *this_fn, void *call_site);
  • void __cyg_profile_func_exit(void *this_fn, void *call_site);
にフックする関数トレース機能を利用する。

原理

任意のブロックというわけにはいかないが、関数内で作られたスコープドポインタを関数から復帰するときに削除する。
スコープドポインタには予め参照先のオブジェクトのデストラクタを設定しておき、スコープドポインタを削除するに先立って参照先のデストラクタを呼び出す。
なお、このプロジェクトでは scoped_ptrという名前ではなく、lwdパッケージの Referenceクラスを用い、「参照」と呼ぶことにする。
その実、この「参照」クラスはスコープドポインタだけではなくシェアードポインタの機能も持たせてある。
例によってこれは実験段階で、幾つかのケースでしか動作が確認できていない。

関数が呼ばれたとき

__cyg_profile_func_enterの中で、つぎのようなことを行う。
関数内で作成された参照を記憶するリストを作成する。
このリストは呼び出しごとに作成されるため、関数を再帰的に呼び出してもどの呼び出しレベルで作られたものか区別することができる。
private boolean suppressed;

private ArrayList frames;

typedef struct Frame* Frame;

struct Frame {
        void* functionAddress;
        ArrayList references;
};

suppressedは、Referenceクラス自身をトレースして循環に陥らないようにするためのフラグ。
フックの処理を開始するときにセットし、抜けるときにリセットする。
このフラグがセットされているときに再びフック関数が呼ばれたときは Referenceの処理中ということで、フック内の処理を全てスキップする。
予め、つぎを定義しておき、
#define NO_INSTRUMENT __attribute__((no_instrument_function))
Referenceクラスの内部の関数には NO_INSTRUMENTを指定してフック関数が呼ばれないようにしているが、Referenceクラス内部で使用している softiesライブラリの関数がトレース対象となるのを防止している。

framesリストは、関数が呼ばれるたびに Frameオブジェクトを追加し、復帰するたびに削除されるリストである。
マルチスレッドで使えるようにスレッドローカルにすべきだが、現在はそうなっていない。
Frameクラスには、関数のアドレスとそのなかで作成された参照のリストが含まれている。関数内で作成される参照の数は不定のため固定長配列ではなく可変長リストの ArrayListクラスを用いている。
Frameクラスは Referenceクラスの内部クラスとして実装されており、無名パッケージに属している。

それでは実際のフック関数をつくってみる。
void NO_INSTRUMENT __cyg_profile_func_enter(void* functionAddress,
        void* callSite)
{
        if (!suppressed) {
                suppressed = true;
                pushNewFrame(functionAddress);
                suppressed = false;
        }
}

pushNewFrame関数が、関数が呼ばれたときのリスト作成を行っている。
private void pushNewFrame(void* functionAddress) {
        Frame frame = new_Frame(functionAddress);
        ArrayList_add(frames, frame);
}

Frameのコンストラクタはこんな感じ。
private Frame new_Frame(void* functionAddress) {
        Frame this = (Frame)malloc(sizeof(struct Frame));

        if (this != null) {
                this->functionAddress = functionAddress;
                this->references = new_ArrayList();
        }

        return this;
}
これで参照の管理の準備ができた。

その2につづく。

心地良いさ、納戸に伝わる君の I love you.

2012年8月26日日曜日

インポート (import)

今日は、インポートの実現方法について解説する。 と言っても、結構ばかばかしい。


これまでの投稿で示した例題では無名パッケージのクラスだったが、命名規則 (naming convention)で示しているように softies projectではパッケージの概念を導入している。
たとえば、単体テストフレームワーク CUnitに Assertクラスがあるが、もしテスト対象で既に別の Assertという名前を使用していると、シンボルの衝突が発生してしまう。
そのため、CUnitは衝突が起こりにくいよう、lwd_unitパッケージに Assertクラスを置いている。

完全修飾名 (fully qualified name)

インポートを使わない場合の Assertクラスの使用例をつぎに示す。(example of using Assert class without import.)
/* 25.Aug.2012 kei */

#include <lwd/unit/Assert.h>

int main() {
        int x = 0;
        lwd_unit_Assert_equalsInt("x equals 0.", 0, x);

        return 0;
}
この様に、長い名前で equalsIntを呼び出さなければならない。
シンボルの衝突は置きにくいが、冗長である。

インポート (import)

インポートを使用した場合の Assertクラスの使用例をつぎに示す。(example of using Assert class with import.)
/* 25.Aug.2012 kei */

#define import_lwd_unit_Assert

#include <lwd/unit/Assert.h>

int main() {
        int x = 0;
        Assert_equalsInt("x equals 0.", 0, x);

        return 0;
}
import_lwd_unit_Assertを定義するだけで、パッケージ名を省き、クラス名と関数名だけで関数呼び出しができるようになる。

仕掛け (mechanism)

Assertクラスのヘッダには次のような記述が含まれており、import_lwd_unit_Assertを定義することにより、Assertクラスの関数名などの長い名前の省略形がマクロ定義されるようになっている。
#ifdef import_lwd_unit_Assert
        #define Assert_equalsInt        lwd_unit_Assert_equalsInt
        #define Assert_equalsLongLong   lwd_unit_Assert_equalsLongLong
        #define Assert_equalsDouble     lwd_unit_Assert_equalsDouble
        #define Assert_equalsString     lwd_unit_Assert_equalsString
        #define Assert_equals           lwd_unit_Assert_equals
        #define Assert_null             lwd_unit_Assert_null
        #define Assert_notNull          lwd_unit_Assert_notNull
        #define Assert_false            lwd_unit_Assert_false
        #define Assert_true             lwd_unit_Assert_true
        #define Assert_fail             lwd_unit_Assert_fail
#endif /* import_lwd_unit_Assert */
仕掛けは単純だが、これがあるかどうかで使いやすさが違ってくる。
通常はインポートを使用し、名前が衝突する場合にのみ FQNで記述すればよい。
なお、クラスのメンバが追加されたり名称に変更があった場合など、忘れずに省略形の修正も行わなければならない。

原発を灰色にするのは…

2012年8月24日金曜日

例外機構 その2 (exception mechanism 2)

(about limitation of softies type exception mechanism)
前回投稿した、例外機構 (exception mechanism)では、その冒頭で「使用上の制約もあることにも留意。」と書いたが、それについてのまとめ。

final節を省略できない (cannot omit finally clause)

finalは GCCの拡張機構であるネスト関数(GCC nested function)を前方参照で呼び出しているため、存在することを前提として try処理を始める。
したがって、final節を省略することはできない。
final節を記述しなかった場合、つぎのような lwd_Environment_finally定義されていないというコンパイルエラーが発生する。
ExceptionExampleTest.c: In function ‘testExceptionWithoutFinal’:
ExceptionExampleTest.c:51:1: error: expected declaration or statement at end of input
ExceptionExampleTest.c:42:2: error: nested function ‘lwd_Environment_finally’
 declared but never defined

throwsの記述ができない (throws clause cannot describe)

Javaではチェック例外と非チェック例外があり、チェック例外をスローする関数に throwsを付けることにより、catchを強制することができる。
C++では例外仕様(exception specifications)を記述して、catchするように促すことができる。
しかし、Cではこのような仕掛けはできそうもない。

1つの関数に複数個並べることができない (multiple try)

finallyはネスト関数名 lwd_Environment_finallyで受けているため1つの関数の中で2つ以上の finallyが書けず、2個以上の tryを書くことができない。
void testDoubleTry() {
        try {
                throw(new_TestException("test 1"));
        } catch (TestException, e) {
                printf("TestException caught, %s\n", e->message);
        } finally {
                printf("finally 1\n");
        }

        try {
                throw(new_TestException("test 2"));
        } catch (TestException, e) {
                printf("TestException caught, %s\n", e->message);
        } finally {
                printf("finally 2\n");
        }
}

このファイルをビルドすると、
$ make
cc -g -finstrument-functions -I.  -I ../../core/include -I ../../experimental/include
 -I ../../io/include -I ../../lang/include -I ../../message/include -I ../../unit/
include -I ../../util/include -I ../../x11/include  -c -o ExceptionExampleTest.o
 ExceptionExampleTest.c
$
ビルドエラーにはならがいが、実行してみると、
[CUnit] ./ExceptionExampleTest: testDoubleTry
TestException caught, test 1
finally 2
TestException caught, test 2
finally 2

どうやら、GCCは1つの関数内に同じ名前のネスト関数が含まれていてもエラーにしないが、後にある関数を呼び出すようだ。
対策としては、つぎのように各々の tryを { }でくくればよい。(ちょっと格好悪い)
void testDoubleTry() {
        { try {
                throw(new_TestException("test 1"));
        } catch (TestException, e) {
                printf("TestException caught, %s\n", e->message);
        } finally {
                printf("finally 1\n");
        }}

        { try {
                throw(new_TestException("test 2"));
        } catch (TestException, e) {
                printf("TestException caught, %s\n", e->message);
        } finally {
                printf("finally 2\n");
        }}
}

つぎのように期待した通りの結果になる。
[CUnit] ./ExceptionExampleTest: testDoubleTry
TestException caught, test 1
finally 1
TestException caught, test 2
finally 2
括弧を付けていないときにエラーにならないのは問題なので、tryごとにダミーのローカル変数かなにかを置けばポカ避けにはなるだろう。

tryのネストはできる (nested try)

tryの中に tryがあるときは問題ない。
void testNestedTry() {
        try {
                try {
                        throw(new_TestException("test inner"));
                } catch (TestException, e) {
                        printf("TestException caught inner, %s\n", e->message);
                } finally {
                        printf("finally inner\n");
                }
                throw(new_TestException("test outer"));
        } catch (TestException, e) {
                printf("TestException caught outer, %s\n", e->message);
        } finally {
                printf("finally outer\n");
        }
}

実行結果は、
[CUnit] ./ExceptionExampleTest: testNestedTry
TestException caught inner, test inner
finally inner
TestException caught outer, test outer
finally outer

catchの中のtryは駄目 (try in catch clause)

void testTryInCatch() {
        try {
                throw(new_TestException("test outer"));
        } catch (TestException, e) {
                printf("TestException caught outer, %s\n", e->message);
                try {
                        throw(new_TestException("test inner"));
                } catch (TestException, e) {
                        printf("TestException caught inner, %s\n", e->message);
                } finally {
                        printf("finally inner\n");
                }
        } finally {
                printf("finally outer\n");
        }
}
catchの中の tryは、外部および内部の finallyの関数呼び出しがいづれも内部の finally関数を参照してしまうためうまくいかない。
[CUnit] ./ExceptionExampleTest: testTryInCatch
TestException caught outer, test outer
finally inner
TestException caught inner, test inner
finally inner
finally outer
しかも、外部の finallyも実行してしまってるし。


貧しくて少し照れちゃうけど

2012年8月21日火曜日

例外機構 (exception mechanism)

オブジェクト指向とは直接関係ないが、言語 Cで例外の実験をしてみたいと思う。
(実験用のため実用にするときには十分な検討が必要。使用上の制約もあることにも留意。)

たとえば、次のようなコードを動かしたい。
try {
                throw(new_TestException("test"));
        } catch (TestException, e) {
                printf("TestException caught, %s\n", e->message);
        } finally {
                printf("finally\n");
        }
構造はつぎのようになる。
try
        主成功シナリオ (main success scenario)
catch
        代替シナリオ (alternative scenario extensions)
finally
        tryブロック終了処理 (always executes when the try block exits)
C++には finallyが無くて困ったことがあるので、なんとか実現したい。
catch節の TestExceptionの後ろに付いている ',' (comma)は間違って付けた鼻くそではない。
Cに無い構文 try - catch - finallyのためにマクロを使おうと思うが、catchは引数つきマクロにするため、型名とインスタンス名の2つを引数を区切る ','が必要となる。

マクロ定義 (macro definition)

例外機構のためのヘッダファイル throw.hを記述してみた。
/*
 * 9.11.12.13.29.31.Dec.2011 kei
 * 15.16.21.Aug.2012
 */

#ifndef _Included_lwd_throw
#define _Included_lwd_throw

#include <setjmp.h>
#include <lwd/Environment.h>

#define lwd_try \
        auto void lwd_Environment_finally(); \
        { \
        struct lwd_Environment lwd_exception; \
        lwd_Environment_push(&lwd_exception); \
        int lwd_jumpStatus = setjmp(lwd_exception.buffer); \
        if (lwd_jumpStatus == 0) {

#define lwd_catch(T, V) \
        } else if (strcmp(lwd_Throwable_getType(lwd_exception.throwable), #T) \
        == 0) { \
                lwd_boolean lwd_Environment_catchClause = lwd_true; \
                lwd_Environment_pop(&lwd_exception); \
                if (!lwd_Environment_isEmpty() \
                && (lwd_exception.throwable != NULL)) \
                        lwd_Environment_setThrowable(&lwd_exception); \
                T V = (T)lwd_exception.throwable; \

#define lwd_finally \
        } else { \
                lwd_Environment_pop(&lwd_exception); \
                if (!lwd_Environment_isEmpty() \
                && (lwd_exception.throwable != NULL)) \
                        lwd_Environment_setThrowable(&lwd_exception); \
                lwd_throw(lwd_exception.throwable); \
        }} \
        lwd_Environment_finally(); \
        void lwd_Environment_finally()

#define lwd_throw(O) \
        if (lwd_Environment_catchClause) \
                lwd_Environment_finally(); \
        if (lwd_Environment_isEmpty()) \
                lwd_Environment_abort((lwd_Throwable)O); \
        lwd_Environment_throw((lwd_Throwable)O)

#endif /* _Included_lwd_throw */

Cで try - catchを実現するほかの多くの例と同様、setjmp, longjmpを使用する。
try, catch, finally, throwは各々 lwd_try, lwd_catch, lwd_finally, lwd_throwとして定義している。
これを、lwd.hファイルの中で置き換えている。
#define try     lwd_try
        #define catch   lwd_catch
        #define finally lwd_finally
        #define throw   lwd_throw

finallyを実現するために、GCC拡張の ローカル関数(関数の中で定義される関数)を使用している。
auto void lwd_Environment_finally()がそれにあたる。
catchの中では、catchClause変数を trueとすることで、外にあるときと throwの動作を切り替えている。
throwが呼ばれたときに直ちに上位階層に longjmpしてしまっては finallyが実行されなくなる。catchClauseが trueの場合は longjmpに先立って finally関数が呼ばれる。ただしこのfinally関数内で throwが行われると、そちらが優先されてしまう。
try 以外のところで throwを実行すると、abortする。

環境 (environment)

setjmp, longjmpのためのコンテキストを保存するために、Environmentクラスを使用している。

Environment.hはつぎのとおり。
/*
 * 9.12.13.29.31.Dec.2011 kei
 * 13.Jan.2012
 * 21.Aug.2012
 */

#ifndef _Included_lwd_Environment
#define _Included_lwd_Environment

#include <setjmp.h>

typedef struct lwd_Environment* lwd_Environment;

#include <lwd/EnvironmentSPI.h>
#include <lwd/Throwable.h>
#include <lwd/types.h>

struct lwd_Environment {
        jmp_buf buffer;
        lwd_Environment chain;
        lwd_Throwable throwable;
};

extern void lwd_Environment_push(lwd_Environment environment);

extern void lwd_Environment_pop(lwd_Environment environment);

extern lwd_boolean lwd_Environment_isEmpty();

extern void lwd_Environment_setThrowable(lwd_Environment environment);

extern const lwd_boolean lwd_Environment_catchClause;

extern void lwd_Environment_throw(lwd_Throwable throwable);

extern void lwd_Environment_finally();

extern void lwd_Environment_abort(lwd_Throwable throwable);

extern void lwd_Environment_setSPI(lwd_EnvironmentSPI spi);

#endif /* _Included_lwd_Environment */

bufferがレジスタなどのコンテキストを保存するための領域。
chainはtryの中でさらに tryを使用する場合にスタック構造をつくるためのもの。
throwableは実際にスローされた例外。
push, pop, isEmptyは tryが多重に呼ばれたときの環境を操作するための関数。
catchClauseは tryの中にいるかどうかを判断するために使用される名称、外部は常に falseになる。
setSPIは、push, pop等の動作を変更したい場合に使用する。

関数定義の Environment.cはつぎのとおり。
/*
 * 9.10.12.13.29.31.Dec.2011 kei
 * 13.Jan.2012
 * 21.Aug.2012
 */

#include <lwd/Environment.h>

#include <lwd/throw.h>
#include <stdio.h>
#include <stdlib.h>

/****************************************************************
 private
****************************************************************/

static lwd_Environment lwd_environment = (void*)0;

static void push(lwd_Environment environment) {
        environment->chain = lwd_environment;
        environment->throwable = NULL;
        lwd_environment = environment;
}

static void pop(lwd_Environment environment) {
        lwd_environment = environment->chain;
}

static lwd_boolean isEmpty() {
        return (lwd_environment == NULL);
}

static void setThrowable(lwd_Environment environment) {
        lwd_environment->throwable = environment->throwable;
}

static struct lwd_EnvironmentSPI singleThreadSPI = {
        push,
        pop,
        isEmpty,
        setThrowable
};

static lwd_EnvironmentSPI environmentSPI = &singleThreadSPI;

/****************************************************************
 public
****************************************************************/

const lwd_boolean lwd_Environment_catchClause = lwd_false;

void lwd_Environment_push(lwd_Environment environment) {
        environmentSPI->push(environment);
}

void lwd_Environment_pop(lwd_Environment environment) {
        environmentSPI->pop(environment);
}

lwd_boolean lwd_Environment_isEmpty() {
        return environmentSPI->isEmpty();
}

void lwd_Environment_setThrowable(lwd_Environment environment) {
        environmentSPI->setThrowable(environment);
}

void lwd_Environment_throw(lwd_Throwable throwable) {
        lwd_environment->throwable = throwable;
        longjmp(lwd_environment->buffer, 1);
}

void lwd_Environment_finally() {
}

void lwd_Environment_abort(lwd_Throwable throwable) {
        printf("uncaught exception '%s' occured.\n",
                lwd_Throwable_getType(throwable));
        exit(1);
}

void lwd_Environment_setSPI(lwd_EnvironmentSPI spi) {
        environmentSPI = (spi != NULL)
                ? spi
                : &singleThreadSPI;
}

デフォルトの SPIはシングルスレッド用である。
マルチスレッドに対応するためには、使用するスレッド機構(例えば pthread)用の SPIを記述し、差し替える必要がある。
abort関数の中で、printfを使用しているが、これは手抜き。fprintfで stderrに出力すべきだ。

テスト (test)

簡単なテストケース ExceptionExampleTest.cをつぎに示す。
/* 15.Aug.2012 kei */

#define import_lwd_unit_CUnit

#include <lwd/lwd.h>
#include <lwd/throw.h>
#include <lwd/Throwable.h>
#include <lwd/unit/CUnit.h>
#include <stdio.h>

lwd_Environment lwd_environment = NULL;

typedef struct TestException* TestException;

struct TestException {
        struct lwd_Throwable throwable;
        char* message;
};

TestException new_TestException(char* message) {
        TestException this =
                (TestException)malloc(sizeof(struct TestException));
        if (this != NULL) {
                lwd_Throwable_Throwable((lwd_Throwable)this, "TestException");
                this->message = message;
        }
        return this;
}

void testException() {
        try {
                throw(new_TestException("test"));
        } catch (TestException, e) {
                printf("TestException caught, %s\n", e->message);
        } finally {
                printf("finally\n");
        }
}

int main(int argc, char** argv) {
 return CUnit_test(argc, argv);
}

実行結果は、つぎの通り。
$ ./ExceptionExampleTest
[CUnit] ./ExceptionExampleTest: testException
TestException caught, test
finally
[SUCCEED] testException in 2(ms)
successes:    1 (100.0%)
failures:     0 (0.0%)
errors:       0 (0.0%)
total:        1 in 2(ms)
$ 

ごっそり、秘密をあげるわ。

2012年8月14日火曜日

継承 その2 (Inheritance 2)

継承 (Inheritance)オーバライド (override)ではサブクラスのインスタンス、関数テーブル構造体の中でスーパクラスのメンバを再定義していた。 今回はこれのうちインスタンスの構造体について、スーパクラスのメンバを記述しないで済む方法を考察する。 なお、関数テーブルもいろいろ試みてみたが、まだ良い方法が見つかっていないため、当面は現状の方式でいこうと思う。

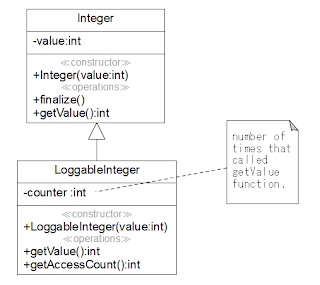
なお、サブクラスの例としては IntegerVariableクラスは不適切である(サブクラスがスーパクラスの privateメンバを直接アクセスしていた)ため、LoggableIntegerクラスを用いる。

バイト列による置き換え (substitution by the byte array)

問題としているのはつぎの箇所である。 (LoggableInteger.cの一部)
struct LoggableInteger {
 interface_LoggableInteger interface_methods;

 /* Integer class */
 int value;

 /* LoggaableInteger class */
 int counter;
};

これの int valueの部分をサイズを保ったまま、抽象化してしまうために、つぎのようにしてみる。
struct LoggableInteger {
        interface_LoggableInteger interface_methods;
        char padding[sizeof_Integer];

        int counter;
};

sizeof_Integerは Integer.hで defineされている。これを char配列のサイズとすることでスーパクラスのインスタンスサイズを確保することができる。


サイズの定数 (constant number of the size)

問題は、sizeof_Integerをどのように求めるかである。
Integerクラスのインスタンス構造体のサイズを求めるには、
sizeof(struct Integer) 
とすれば良いのだが、隠蔽するために struct Integer構造体は Integer.hではなく、Integer.cに記述している。
したがって、LoggableIntegerクラスが Integer.hをインクルードしても、sizeofでサイズを求めることはできない。 そこで苦肉の策として、定数を直接ヘッダファイル Integer.hに記述している。
#define sizeof_Integer  4

そうすると、Integerクラスのインスタンス変数を変更すると、この値を忘れずに修正しなければならない。しかも、処理系によってメンバが整列されることがあるため、計算は単純ではない。
そこで、つきのような引数付きマクロを使って実行時に自己チェックするようにしてみる。
#define interface_sizeof(CLASS) \
        if (sizeof_##CLASS != sizeof(struct CLASS) - sizeof(void*)) { \
                printf("sizeof struct %s expected %d but %d\n", \
                        #CLASS, \
                        sizeof(struct CLASS) - sizeof(void*), \
                        sizeof_##CLASS); \
                abort(); \
        }


このマクロをつぎのように、クラスの初期化関数の中で呼び出す。
void static_Integer(interface_Integer interface_methods) {
        /* ToDo: lock interface_methods */
        if (interface_methods->finalize == NULL) {
                interface_sizeof(Integer);

                interface_methods->finalize = finalize;
                interface_methods->getValue = getValue;
        }
}


sizeof_Integerの値は最初は適当な値にしておけばよい。たとえば次のように 0としておく。
#define sizeof_Integer  0


これで以前に示したテストケースを実行すると、
$ ./IntegerTest
[CUnit] ./IntegerTest: testGetValue
sizeof struct Integer expected 4 but 0
signal: Abort(6)
[ABORT] testGetValue
[CUnit] ./IntegerTest: testNewAndFinalize
sizeof struct Integer expected 4 but 0
signal: Abort(6)
[ABORT] testNewAndFinalize
[ERROR] testGetValue in 803(ms)
[ERROR] testNewAndFinalize in 811(ms)
successes:    0 (0.0%)
failures:     0 (0.0%)
errors:       2 (100.0%)
total:        2 in 1614(ms)
$ 

このように、struct Integerのサイズは 4バイトであることが判明するため、defineの 0を 4に修正することができる。
一旦失敗して表示された値を用いる 2パス方式は、なんとも間抜けな気もするが、unit testを推進するという口実にしておこう。

なお、マクロはこのクラス以外でも使用したいために、適当なヘッダファイルに記述することにする。
また、このマクロは printf関数を使用しているため、どこかで stdio.hをインクルードする必要がある。
クラスによっては stdio.hをインクルードしたくない場合もあるため、この点は今後の課題とする。

あの少女は まるで恋だね。

2012年8月13日月曜日

オーバライド (override)

前回の 継承 (Inheritance)ができたので、これを応用すればスーパクラスで定義されている関数をサブクラス側で上書きする、オーバライドができる。


Integerクラスのサブクラス LoggableIntegerクラスには、スーパクラスの getValue関数をオーバライドする。この関数は Integerのそれど同様 int型の値を返すが、この関数を呼び出した回数を変数 counterに記録し、getAccessCount関数で読み出せるようにする。


ヘッダファイル (header file)

LoggableInteger.hはつぎの通り。
/* 13.Aug.2012 kei */

#ifndef _Included_LoggableInteger
#define _Included_LoggableInteger

typedef struct LoggableInteger* LoggableInteger;

typedef struct interface_LoggableInteger {

        void (*finalize)(LoggableInteger this);
        int (*getValue)(LoggableInteger this);

        int (*getAccessCount)(LoggableInteger this);
}* interface_LoggableInteger; 

extern void static_LoggableInteger(interface_LoggableInteger interface_methods);

extern LoggableInteger new_LoggableInteger(int value);

extern void LoggableInteger_init(LoggableInteger this, int value);

extern void LoggableInteger_finalize(LoggableInteger this);

extern int LoggableInteger_getValue(LoggableInteger this);

extern int LoggableInteger_getAccessCount(LoggableInteger this);

#endif /* _Included_LoggableInteger */

変数や関数が違う点以外は IntegerValueクラスのヘッダと同様。

ソースファイル (source file)

LoggableInteger.cはつぎの通り。
/* 13.Aug.2012 kei */

#include <LoggableInteger.h>
#include <Integer.h>

/****************************************************************
 private
****************************************************************/

#include <malloc.h>

struct LoggableInteger {
        interface_LoggableInteger interface_methods;

        /* Integer class */
        int value;

        /* LoggaableInteger class */
        int counter;
};

static struct interface_LoggableInteger interface_methods;
static struct interface_Integer super;

static int getValue(LoggableInteger this) {
        ++this->counter;
        return Integer_getValue((Integer)this);
}

static int getAccessCount(LoggableInteger this) {
        return this->counter;
}

/****************************************************************
 public
****************************************************************/

void static_LoggableInteger(interface_LoggableInteger interface_methods) {
        /* ToDo: lock interface_methods */
        if (interface_methods->finalize == NULL) {
                static_Integer(&super);
                static_Integer((interface_Integer)interface_methods);

                interface_methods->getValue = getValue;
                interface_methods->getAccessCount = getAccessCount;
        }
}

LoggableInteger new_LoggableInteger(int value) {
        static_LoggableInteger(&interface_methods);

        LoggableInteger this =
                (LoggableInteger)malloc(sizeof(struct LoggableInteger));

        if (this != NULL)
                LoggableInteger_init(this, value);

        return this;
}

void LoggableInteger_init(LoggableInteger this, int value) {
        Integer_init((Integer)this, value);
        this->interface_methods = &interface_methods;
}

void LoggableInteger_finalize(LoggableInteger this) {
        this->interface_methods->finalize(this);
}

int LoggableInteger_getValue(LoggableInteger this) {
        return this->interface_methods->getValue(this);
}

int LoggableInteger_getAccessCount(LoggableInteger this) {
        return this->interface_methods->getAccessCount(this);
}

これも IntegerVariableクラスとほぼ同じだが、getValue関数をオーバライドするため、LoggableIntegerクラスで改めて定義し、static_LoggableIntegerで getValue関数を設定している。
static_Integer関数を呼び出した時点で、interface_methodsには一旦スーパクラスの getValue関数が設定される。その後でサブクラスの関数を上書きしている。 概念だけでなく実際に上書きしているので、如何にも "override"の感じがする。

関数テーブルは interface_methodsのほかに Integerクラス用の superも定義している。
これは、Integerクラスの getValueを呼び出すために必要となる。

getValue関数の中では、 super.getValue((Integer)this); を呼び出すことにより、スーパクラスの取得関数を利用している。

動作確認 (unit test)

テストケース LoggableIntegerTest.cはつぎの通り。
/* 14.Aug.2012 kei */

#define import_lwd_unit_Assert
#define import_lwd_unit_CUnit

#include <lwd/unit/Assert.h>
#include <lwd/unit/CUnit.h>
#include <LoggableInteger.h>

/****************************************************************
 test cases
****************************************************************/

static LoggableInteger instance;

void setUp() {
        instance = new_LoggableInteger(813);
}

void tearDown() {
        LoggableInteger_finalize(instance);
}

void testNewAndFinalize() {
        /* setUp, tearDown */
}

void testGetValue() {
        int value = LoggableInteger_getValue(instance);
        Assert_equalsInt("A value must be 813.", 813, value);
}

void testGetAccessCount() {
        Assert_equalsInt("must be zero.",
                0, LoggableInteger_getAccessCount(instance));

        LoggableInteger_getValue(instance);

        Assert_equalsInt("must be 1.",
                1, LoggableInteger_getAccessCount(instance));
}

/****************************************************************
 main
****************************************************************/

int main(int argc, char** argv) {
        return CUnit_test(argc, argv);
}

テストのビルドと実行結果も残しておく。
$ make
cc -g -finstrument-functions -I. -I /export/home/kei/c/core/include -I /export/home/
kei/c/experimental/include -I /export/home/kei/c/io/include -I /export/home/kei/c/lang
/include -I /export/home/kei/c/message/include -I /export/home/kei/c/unit/include -I
 /export/home/kei/c/util/include -I /export/home/kei/c/x11/include -I ../../char/
include -I ../../class1/include  -c -o LoggableIntegerTest.o LoggableIntegerTest.c
$ ./LoggableIntegerTest
[CUnit] ./LoggableIntegerTest: testGetAccessCount
[CUnit] ./LoggableIntegerTest: testGetValue
[CUnit] ./LoggableIntegerTest: testNewAndFinalize
[SUCCEED] testGetAccessCount in 1(ms)
[SUCCEED] testGetValue in 2(ms)
[SUCCEED] testNewAndFinalize in 2(ms)
successes:    3 (100.0%)
failures:     0 (0.0%)
errors:       0 (0.0%)
total:        3 in 5(ms)
$ 

竜巻情報が出された。豹が降る恐れがあるとか言っている。

2012年8月12日日曜日

継承 (Inheritance)

前回のインスタンス関数のテーブル (table of instance function)の方法を活用して継承をやってみよう。

いつもの Integerクラスを継承して値を変更する機能を持つ IntegerVariableクラスをつくってみる。


ヘッダファイル (header file)

IntegerVariableクラスのヘッダを次に示す。
/* 11.Aug.2012  kei moses kissinger */

#ifndef _Included_IntegerVariable
#define _Included_IntegerVariable

typedef struct IntegerVariable* IntegerVariable;

typedef struct interface_IntegerVariable {

        /* Integer class */
        void (*finalize)(IntegerVariable this);
        int (*getValue)(IntegerVariable this);

        /* IntegerVariable class */
        void (*setValue)(IntegerVariable this, int value);
}* interface_IntegerVariable;

extern void static_IntegerVariable(interface_IntegerVariable interface_methods);

extern IntegerVariable new_IntegerVariable(int value);

extern void IntegerVariable_init(IntegerVariable this, int value);

extern void IntegerVariable_finalize(IntegerVariable this);

extern int IntegerVariable_getValue(IntegerVariable this);

extern void Integer_Variable_setValue(IntegerVariable this, int value);

#endif /* _Included_IntegerVariable */

基本的な構造は Integerクラスのものと同じである。
interface_IntegerVariableのメンバに setValue関数のポインタが追加されている。
注意が必要なのは、IntegerVariableで追加する関数よりも前の部分はスーパクラスのものと内容(関数ポインタの数とその順序)が同じでなければならない。そうでなければ呼び出したときに意図したものと異なる振る舞いをする。
ただし、スーパクラスで定義された関数であっても、thisポインタのクラス名だけは自クラスに置き換えている。これは呼び出し時にキャストを不要にするためである。
Cのキャストは何でも出来るため危険であり、キャストした内容を保証するのはプログラマの責任である。 softies projectでは呼び出しごとにキャストするのではなく、型変換を関数テーブルの初期化時に限定することで間違いを起こしにくくする戦略を採っている。 先ほどの関数テーブルのスーパクラス部分を同じにする注意点はキャストを安全に行うために必要である。
今までに無かった init関数はインスタンスを初期化する部分である。詳細はソースファイルのところで述べる。
IntegerVariableクラスで追加された setValue関数は勿論、継承する finalize, getValue関数も宣言し、各々 thisポインタは IntegerVariableクラスとしている。これは無くとも良いが、そうすると呼び出し側で毎回
this->interface_methods->getValue((Integer)this); 
のように記述しなければならなくなる。

ソースファイル (source file)

IntegerVariableクラスのソースを次に示す。
/* 11.Aug.2012  kei */

#include <IntegerVariable.h>
#include <Integer.h>

/****************************************************************
        private
****************************************************************/

#include <malloc.h>

struct IntegerVariable {
        interface_IntegerVariable interface_methods;

        /* Integer class */
        int value;  /* A bogus example. private value replaced with protected. */

        /* IntegerVariable class */
};

static struct interface_IntegerVariable interface_methods;

static void setValue(IntegerVariable this, int value) {
        this->value = value;
}

/****************************************************************
        public
****************************************************************/

void static_IntegerVariable(interface_IntegerVariable interface_methods) {
        /* ToDo: lock interface_methods */
        if (interface_methods->finalize == NULL) {
                static_Integer((interface_Integer)interface_methods);

                interface_methods->setValue = setValue;
        }
}

IntegerVariable new_IntegerVariable(int value) {
        static_IntegerVariable(&interface_methods);

        IntegerVariable this =
                (IntegerVariable)malloc(sizeof(struct IntegerVariable));

        if (this != NULL)
                IntegerVariable_init(this, value);

        return this;
}

void IntegerVariable_init(IntegerVariable this, int value) {
        Integer_init((Integer)this, value);
        this->interface_methods = &interface_methods;
}

void IntegerVariable_finalize(IntegerVariable this) {
        this->interface_methods->finalize(this);
}

int IntegerVariable_getValue(IntegerVariable this) {
        return this->interface_methods->getValue(this);
}

void IntegerVariable_setValue(IntegerVariable this, int value) {
        this->interface_methods->setValue(this, value);
}

冒頭では自身のヘッダ IntegerVariable.hとスーパクラスの Integer.hをインクルードしている。
IngerVariable.hの中ではスーパクラスが Integerクラスであることが明示されていないためである。(コメントに記述されているのみ。)
struct IntegerVariableでは、関数テーブルと同様に、プログラマの責任でスーパクラスの構造を引用しなければならない。 int valueをサブクラスでも記述しているてんがそれである。スーパクラスに属性を追加したとき、サブクラスも修正が必要であることを意味する。 ただしこの点の改善方法は別の機会に紹介する。
setValue関数が実装されているが、finalizeと getValueは Integerクラスを継承しているためこのクラスでは実装していない。
static_IntegerVariable関数は、以前示した static_Integerと同じように関数のポインタを関数テーブルに設定しているが、スーパクラスの関数を利用するために static_Integerを冒頭で呼び出している。
コンストラクタは new_IntegerVariableと IntegerVariable_initの2つの部分から成っている。new_IntegerVariableではインスタンスのためのメモリ割り当てを行うだけで初期化は IntegerVariable_initのほうで行っている。その訳はIntegerクラスの init関数のところで説明する。

あとから気づいたのだが、setValue関数にはインチキが含まれている。クラス図では Integerの valueは privateとしてあるが、これをサブクラスからアクセスしてるのだから protectedでなければならない。

Integerクラスの init関数 (init function of Integer class)

init関数を追加するために Integer.h, Integer.cを修正する。 (part of Integer.h, Integer.c)
extern Integer new_Integer(int value);

extern void Integer_init(Integer this, int value);

extern void Integer_finalize(Integer this);

Integer new_Integer(int value) {
        static_Integer(&interface_methods);

        Integer this = (Integer)malloc(sizeof(struct Integer));

        if (this != NULL)
                Integer_init(this, value);

        return this;
}

void Integer_init(Integer this, int value) {
        this->interface_methods = &interface_methods;

        this->value = value;
}

コンストラクタを newと initに分けた理由は、initをサブクラスの初期化からも呼び出したいからである。
newでメモリを確保して initを呼び出している。サブクラスではサブクラス自身の newでメモリ割り当てを行うため、スーパクラスの初期化だけを行う機能を呼び出したい。newと initの機能が一体になっていたのでは不要なメモリ割り当てが発生してしまうのである。

使用例 (example of use)

IntegerVariableクラスのテストケース IntegerVariableTest.cをつぎに示す。
/* 11.Aug.2012  kei */

#define import_lwd_unit_Assert
#define import_lwd_unit_CUnit

#include <lwd/unit/Assert.h>
#include <lwd/unit/CUnit.h>

#include <IntegerVariable.h>
#include <Integer.h>

/****************************************************************
        test cases
****************************************************************/

static IntegerVariable instance;

void setUp() {
        instance = new_IntegerVariable(811);
}

void tearDown() {
        IntegerVariable_finalize(instance);
}

void testNewAndFinalize() {
        /* setUp, tearDown */
}

void testGetValue() {
        int value = IntegerVariable_getValue(instance);
        Assert_equalsInt("A value must be 811", 811, value);
}

void testSetValue() {
        IntegerVariable_setValue(instance, 812);

        int value = IntegerVariable_getValue(instance);
        Assert_equalsInt("A value must be 812", 812, value);
}

void testInheritedGetValue() {
        Integer reference = (Integer)instance;
        int value = Integer_getValue(reference);
        Assert_equalsInt("A value must be 811", 811, value);
}

/****************************************************************
        main
****************************************************************/

int main(int argc, char** argv) {
        return CUnit_test(argc, argv);
}

testGetValue()と testInheritedGetValue()では各々自クラスとスーパクラスとして保持したインスタンスで継承をテストしている。

動作確認の様子をつぎに示す。 なお、コンストラクタを newと initの部分に分けた Integerクラスも回帰テスト (regression test) している。
$ make clean test
cc -g -finstrument-functions -I. -I /export/home/kei/c/core/include -I /export/home
/kei/c/experimental/include -I /export/home/kei/c/io/include -I /export/home/kei/c
/lang/include -I /export/home/kei/c/message/include -I /export/home/kei/c/unit/include
 -I /export/home/kei/c/util/include -I /export/home/kei/c/x11/include -I ../../char/
include -I ../../class1/include  -c -o IntegerTest.o IntegerTest.c
cc -g -finstrument-functions -I. -I /export/home/kei/c/core/include -I /export/home
/kei/c/experimental/include -I /export/home/kei/c/io/include -I /export/home/kei/c
/lang/include -I /export/home/kei/c/message/include -I /export/home/kei/c/unit/include
 -I /export/home/kei/c/util/include -I /export/home/kei/c/x11/include -I ../../char/
include -I ../../class1/include  -c -o IntegerVariableTest.o IntegerVariableTest.c
# IntegerTest #
[CUnit] ./IntegerTest: testGetValue
[CUnit] ./IntegerTest: testNewAndFinalize
[SUCCEED] testGetValue in 2(ms)
[SUCCEED] testNewAndFinalize in 2(ms)
successes:    2 (100.0%)
failures:     0 (0.0%)
errors:       0 (0.0%)
total:        2 in 4(ms)
# IntegerVariableTest #
[CUnit] ./IntegerVariableTest: testGetValue
[CUnit] ./IntegerVariableTest: testInheritedGetValue
[CUnit] ./IntegerVariableTest: testNewAndFinalize
[CUnit] ./IntegerVariableTest: testSetValue
[SUCCEED] testGetValue in 3(ms)
[SUCCEED] testInheritedGetValue in 1(ms)
[SUCCEED] testNewAndFinalize in 2(ms)
[SUCCEED] testSetValue in 2(ms)
successes:    4 (100.0%)
failures:     0 (0.0%)
errors:       0 (0.0%)
total:        4 in 8(ms)
$ 


おまえ、AKB48のファンだって?全員の名前言えるか? 俺なんか Perfumeの全員の名前スラスラ言えるぞ!

2012年8月9日木曜日

インスタンス関数のテーブル (table of instance function)

オブジェクト指向設計、プログラミング(Die objektorientierte design und programmierung)にとって重要な機構の 1つとして、汎化・特化(generalization - specialization)、あるいは継承(inheritance)がある。ここでは、継承を説明する前にその準備段階としてインスタンス関数をテーブル化する方法について説明する。 C++では仮想関数テーブル(vtable)と呼ばれているものである。 C++では仮想関数と非仮想関数を使い分けることができる。 softies projectの技法でも同様にこれらを使い分けることができるが、原則として全てのインスタンス関数は仮想関数であることが要求されている。

ヘッダファイル (header file)

これまでに何度か登場している Integerクラスを仮想関数に対応させるためのヘッダファイルをつぎに示す。
なお、前回実装した UpDownインターフェースは外している。
/* 4.7.9.Aug.2012       kei moses kissinger */

#ifndef _Included_Integer
#define _Included_Integer

typedef struct Integer* Integer;

typedef struct interface_Integer {
        void (*finalize)(Integer this);
        int (*getValue)(Integer this);
}* interface_Integer;

extern void static_Integer(interface_Integer interface_methods);

extern Integer new_Integer(int value);

extern void Integer_finalize(Integer this);

extern int Integer_getValue(Integer this);

#endif /* _Included_Integer */


仮想関数を使うためにヘッダファイルに必要になるのは interface_Integer構造体と、それを初期化するための static_Integer関数の2つだけである。

命名規則 (naming convention)では、クラス名の前にパッケージ名を付けると述べたが、この場合の接頭辞 interface, staticはパッケージ名ではなくキーワードである。 Cのキーワードとは異なる使い方のため、空白ではなく'_'で結合している。

また、関数テーブル interface_Integerは循環参照を使用しないことが明らかであるため、typedefと structの定義は分離していない。

ソースファイル (source file)

関数テーブルを使った Interfaceクラスのソースファイルを次に示す。
/* 4.7.9.Aug.2012       kei */

#include <Integer.h>

/****************************************************************
        private
****************************************************************/

#include <malloc.h>

struct Integer {
        interface_Integer interface_methods;

        int value;
};

static struct interface_Integer interface_methods;

static void finalize(Integer this) {
        free(this);
}

static int getValue(Integer this) {
        return this->value;
}

/****************************************************************
        public
****************************************************************/

void static_Integer(interface_Integer interface_methods) {
        /* ToDo: lock interface_methods */
        if (interface_methods->finalize == NULL) {

                interface_methods->finalize = finalize;
                interface_methods->getValue = getValue;
        }
}

Integer new_Integer(int value) {
        static_Integer(&interface_methods);

        Integer this = (Integer)malloc(sizeof(struct Integer));

        if (this != NULL) {
                this->interface_methods = &interface_methods;

                this->value = value;
        }

        return this;
}

void Integer_finalize(Integer this) {
        this->interface_methods->finalize(this);
}

int Integer_getValue(Integer this) {
        return this->interface_methods->getValue(this);
}


関数テーブルを使用することによるヘッダファイルの変更量は小さいが、ソースファイルはかなり複雑になっている。

struct Integerの先頭のメンバに interface_methodsが追加されている。これが C++のvtableであり、OMTで struct ShapeClass * class; と書かれているものとほぼ同じである。

外部 static変数 interface_methodsは関数テーブルの実体である。インスタンスそれぞれに関数テーブルを配することもできるが、インスタンスが多くなるとその関数テーブルのためのメモリもその数分必要になってしまう。そこでクラスごとに関数テーブルを1個だけとし、インスタンスにはそれへのポインタのみを持つようにすることでメモリ(内存, memory)を節約してる。 なお、関数テーブルを constとしないのには訳がある。クラスの継承を行うときのために、関数テーブルを静的に初期化するのではなく、1個ずつ設定できるようにするためである。これは継承の説明をするときに明らかにする。

2つの static関数 finalize, getValueは各々これまでの実装での Integer_finalize, Integer_getValueに記述されていた、機能の実装である。 代わりに Integer_finalize, Integer_getValueは関数テーブル経由で finalize, getValue関数を呼び出している。 これは一見無駄に見えるかも知れないが、継承による多相性(多態性: polymorphism)を実現するために重要な仕組みである。

static_Integer関数では、methods_tableの初期化を行っている。 外部 static変数の methods_tableを直接初期化するのではなく、わざわざ引数で渡して物を初期化しているのも継承クラスの初期化にも使用するためである。継承の例は次回お見せすることになる。

methods_tableの初期化は 1回だけで良いため、finalizeが nullのときだけ設定を行なう。

この実装では、複数の threadから同時に呼ばれたときに、競合が生ずる。特に継承した場合には深刻な問題を起こす可能性がある。実際にはロックが必要。

この static_Integerはコンストラクタ new_Integerの先頭で呼び出している。単純にするために、このようにコンストラクタから毎回呼び出してるが、最初に関数テーブルが使用されるよりも前に確実に、1回だけ呼び出すことができればオーバヘッドは解消される。この点はまだ良い方法を見つけておらず、今後の課題である。

そして、インスタンス変数初期化時にインスタンスメンバの interface_methodsポインタに、interface_methods実体のアドレスを設定する。

ビルドはつぎの通り。
$ make clean install
rm -f "libclass1.a";
rm -f *.o;
cc -g -I /export/home/kei/c/core/include -I /export/home/kei/c/experimental/include
 -I /export/home/kei/c/io/include -I /export/home/kei/c/lang/include -I /export/home/
kei/c/message/include -I /export/home/kei/c/unit/include -I /export/home/kei/c/util/
include -I /export/home/kei/c/x11/include -I ../../char/include -I ../../class1/
include -D_REENTRANT  -c -o Integer.o Integer.c
ar cvrf "libclass1.a" Integer.o ;
a - Integer.o
mkdir -p /export/home/kei/sub/class1/lib;
libclass1.a updated.
$ 


回帰テスト(regression test)はつぎの通り。
$ make clean test
cc -g -finstrument-functions -I. -I /export/home/kei/c/core/include -I /export/home/
kei/c/experimental/include -I /export/home/kei/c/io/include -I /export/home/kei/c/
lang/include -I /export/home/kei/c/message/include -I /export/home/kei/c/unit/
include -I /export/home/kei/c/util/include -I /export/home/kei/c/x11/include -I ../
../char/
include -I ../../class1/include  -c -o IntegerTest.o IntegerTest.c
# IntegerTest #
[CUnit] ./IntegerTest: testGetValue
[CUnit] ./IntegerTest: testNewAndFinalize
[SUCCEED] testGetValue in 3(ms)
[SUCCEED] testNewAndFinalize in 1(ms)
successes:    2 (100.0%)
failures:     0 (0.0%)
errors:       0 (0.0%)
total:        2 in 4(ms)
$ 


softies projectとは (what is softies project)

softiesは "Stupid Object Framework TechnologIES" を表したもの。

何ら新しい技術を用いているわけではないが、プログラミング言語 Cでオブジェクト指向プログラミングの基本機構の幾つかを実現している。UMLで設計したものを Cで実装できることを目標にしている。

まったく馬鹿げており、人手でコーディングするのは現実的では無いと思われ、C++を使用すべき状況である。しかし、ここで紹介している全ての手法を同時に用いるのではなく、期待する効果を絞り、そのために必要な方法だけを真似していただければきっと役に立つものと思われる。


小原日登美に続き伊調馨の金で君が代が流れ

2012年8月8日水曜日

インターフェース (interface)

プログラミング言語 Cでインターフェース機能を使うことは難しくはない。

以前の例題の Interfaceクラスを少し改造して UpDownインターフェースを実装する例を示す。


インターフェースのヘッダ (header of interface)

UpDownインターフェースのヘッダはつぎの通り。
/* 7.Aug.2012 kei Moses Kissinger */

#ifndef _Included_UpDown
#define _Included_UpDown

typedef struct UpDown* UpDown;

struct UpDown {
        void (*up)(void* this);
        void (*down)(void* this);
};

#endif /* _Included_UpDown */

このように、構造体のメンバに関数ポインタを使用するのが一般的。

UpDownインターフェースは Integerクラス以外からも使えるため、引数の thisの型は void*にしてある。

もし Integerクラスでしか使用しないなら、わざわざインターフェースにする意味はほとんどないだろう。

実装クラスのヘッダ (header of implementation class)

UpDownインターフェースを実装する Integerクラスのヘッダファイルはつぎの通り。
/* 4.7.Aug.2012 kei */

#ifndef _Included_Integer
#define _Included_Integer

typedef struct Integer* Integer;

#include <UpDown.h>

extern UpDown Integer_interface_UpDown;

extern Integer new_Integer(int value);

extern void Integer_finalize(Integer this);

extern int Integer_getValue(Integer this);

extern void Integer_up(Integer this);

extern void Integer_down(Integer this);

#endif /* _Included_Integer */

Integer_interface_UpDownがインターフェースの構造体へのポインタ。

Integer_upと Integer_down関数はインターフェースを介さずにも呼べるようにするためのもの。インターフェース経由でしか呼ばないなら不要である。

実装 (implementation)

UpDownインターフェースを実装した Integerクラスのソースファイルはつぎの通り。
/* 4.7.Aug.2012 kei */

#include 

struct Integer {
        int value;
};

#include <malloc.h>

Integer new_Integer(int value) {
        Integer this = (Integer)malloc(sizeof(struct Integer));

        if (this != NULL) {
                this->value = value;
        }

        return this;
}

void Integer_finalize(Integer this) {
        free(this);
}

int Integer_getValue(Integer this) {
        return this->value;
}

void Integer_up(Integer this) {
        ++this->value;
}

void Integer_down(Integer this) {
        --this->value;
}

static struct UpDown interface_UpDown = {
        (void (*)(void*))Integer_up,
        (void (*)(void*))Integer_down
};

UpDown Integer_interface_UpDown = &interface_UpDown;

Integer_up, Integer_downは通常の public関数同様に記述しているが、up, downをインターフェース経由でしか利用しないなら、staticな関数として非公開にし、名前も increment, decrementのようなインターフェースの関数名とは異なるものにしても良い。その場合、関数名は他のソースファイルとは衝突する恐れが無いため、命名規約に沿った長い名前を付ける必要もない。

struct UpDownにて、upと down関数のポインタを設定している。 このとき、インターフェースの関数の型に合わせる為、キャストが必要となる。 ちょっと残念。

参考のため、ビルドの例も付けておく。
$ make install
cc -g -I /export/home/kei/c/core/include -I /export/home/kei/c/experimental/include
 -I /export/home/kei/c/io/include -I /export/home/kei/c/lang/include -I /export/home/
kei/c/message/include -I /export/home/kei/c/unit/include -I /export/home/kei/c/util/
include -I /export/home/kei/c/x11/include -I ../../char/include -I ../../class1/
include -D_REENTRANT  -c -o Integer.o Integer.c
ar cvrf "libclass1.a" Integer.o ;
r - Integer.o
mkdir -p /export/home/kei/sub/class1/lib;
libclass1.a updated.
$ 

なお、この方式では UpDown.cファイルは存在しない。

使用例 (example)

CUnitを使って使用例を示す。
/* 4.7.Aug.2012 kei */

#define import_lwd_unit_Assert
#define import_lwd_unit_CUnit

#include <Integer.h>
#include <lwd/unit/Assert.h>
#include <lwd/unit/CUnit.h>

static Integer instance;

void setUp() {
        instance = new_Integer(777);
}

void tearDown() {
        Integer_finalize(instance);
}

void testNewAndFinalize() {
        /* setUp and tearDown are invoked. */
}

void testGetValue() {
        int value = Integer_getValue(instance);

        Assert_equalsInt("A value must be 777.", 777, value);
}

void testUp() {
        UpDown upDown = Integer_interface_UpDown;
        upDown->up(instance);

        int value = Integer_getValue(instance);
        Assert_equalsInt("A value must be 778.", 778, value);
}

void testDown() {
        UpDown upDown = Integer_interface_UpDown;
        upDown->down(instance);

        int value = Integer_getValue(instance);
        Assert_equalsInt("A value must be 776.", 776, value);
}

int main(int argc, char** argv) {
        return CUnit_test(argc, argv);
}
testUp, testDown関数で各々 UpDownインターフェースを求め、up, down関数を呼び出している。
Integer_interface_UpDownのままでも up, down関数は呼べちゃうが、そうすると抽象化の意味は薄れる。

実際の使用場面では関数呼び出しや他のオブジェクトのメンバとして使われると思うが、この方式では常にインターフェースとインスタンスを組にして扱わなければならない。 つまり関数呼び出しではインターフェースとインスタンスで引数は 2個必要だし、クラスのメンバにするときも同様にインターフェースとインスタンスのメンバが必要となる。

これは単に 2個ずつペアにするという手間だけの問題ではない。 もしインターフェースとインスタンスが別々のクラスのものを組み合わせたとき、悲劇が起こるだろう。たとえば、同じ UpDownインターフェースを実装した Integerとは全く異なる GuiSliderクラスがあったとして、次のような呼び出しを考えてみて欲しい。
setObject(Integer_interface_UpDown, guiSlider);  /* very bad! */

参考のため実行例も示す。
$ make clean test
cc -g -finstrument-functions -I. -I /export/home/kei/c/core/include -I /export/home/
kei/c/experimental/include -I /export/home/kei/c/io/include -I /export/home/kei/c/
lang/include -I /export/home/kei/c/message/include -I /export/home/kei/c/unit/include
 -I /export/home/kei/c/util/include -I /export/home/kei/c/x11/include -I ../../char/
include -I ../../class1/include  -c -o IntegerTest.o IntegerTest.c
# IntegerTest #
[CUnit] ./IntegerTest: testDown
[CUnit] ./IntegerTest: testGetValue
[CUnit] ./IntegerTest: testNewAndFinalize
[CUnit] ./IntegerTest: testUp
[SUCCEED] testDown in 2(ms)
[SUCCEED] testGetValue in 2(ms)
[SUCCEED] testNewAndFinalize in 3(ms)
[SUCCEED] testUp in 2(ms)
successes:    4 (100.0%)
failures:     0 (0.0%)
errors:       0 (0.0%)
total:        4 in 9(ms)
$ 


softies projectでのインターフェース

softiesでは、インターフェースはこの方法よりもより手の込んだやり方で実現している。それにより、前述の問題を解決し、インスタンスからインターフェースを取り出せるようにしている。

ただし、CUnit frameworkだけはこの例に近い方法を用いている。そうすることにより、softiesの設計・コーディング規約に従わない普通の Cのプログラムも単体テストできるようになっている。

babe 鯨

2012年8月5日日曜日

クラスの定義 (definition of class)

つぎの図に示す Integerクラスを用いてプログラミング言語 Cでのクラス定義の典型的な例を紹介する。


属性として 1個の int値を持つクラスで、コンストラクタによってこの値が初期化される。

finalizeは オブジェクトを破棄する関数である。

getValueは 値を返す関数である。


ヘッダファイル (header file)

ヘッダファイル Integer.hはつぎのようになる。
/* 4.Aug.2012   kei */

#ifndef _Included_Integer
#define _Included_Integer

typedef struct Integer* Integer;

extern Integer new_Integer(int value);

extern void Integer_finalize(Integer this); 

extern int Integer_getValue(Integer this);

#endif /* _Included_Integer */
多重インクルード防止した上で、型の定義、コンストラクタや関数の宣言を記述する。

型定義については構造体(structure)と typedefで述べているように構造体名と同じ名前を定義し、ポインタも含めてある。

コンストラクタ名は接頭辞として new_を付けてある。命名規約にあるようにクラス名の後ではなく前につけてあるのは newはメンバ関数ではなく C++や Javaの new演算子をエミュレーションしたものだからである。

finalize, getValue関数は引数として自オブジェクトを渡す。この名称は thisを使用しているが、C++から利用する可能性があるならば、thisキーワードとの衝突を防止するために selfなどにするのが良いだろう。(OMT本では selfが使われている)

ソースファイル (source file)

ソースファイル Integer.cを次に示す。
/* 4.Aug.2012   kei */

#include <Integer.h>

struct Integer {
        int value;
};

#include <malloc.h>

Integer new_Integer(int value) {
        Integer this = (Integer)malloc(sizeof(struct Integer));

        if (this != NULL) {
                this->value = value;
        }

        return this;
}

void Integer_finalize(Integer this) {
        free(this);
}

int Integer_getValue(Integer this) {
        return this->value;
}
構造体の定義はヘッダファイルではなくソースファイルに記述することにより内部構造を隠蔽することができる。ただこの方法にはクラスを継承させようとしたときに、スーパクラスのインスタンスのサイズを得ることができなくなるデメリットもある。

コンストラクタでは malloc関数を用いてメモリを割り当て、インスタンス変数を初期化し、メモリのアドレスを returnする。

デストラクタでは free関数を用いてメモリを解放する。

getValue関数ではインスタンス変数の値を返却する。

これらから、オブジェクトを生成、利用、破棄がプログラム言語 Cでも実現できることが解かる。thisをコンストラクタで returnしたり、インスタンス関数の引数にすることを明示的に行わなければならない点がオブジェクト指向言語とは異なる。


ビルド (build)

ビルドしてみる。
$ make clean install
rm -f "libclass1.a";
rm -f *.o;
cc -g -I /export/home/kei/c/core/include -I /export/home/kei/c/experimental/include -I
 /export/home/kei/c/io/include -I /export/home/kei/c/lang/include -I /export/home/kei/
c/message/include -I /export/home/kei/c/unit/include -I /export/home/kei/c/util/
include -I /export/home/kei/c/x11/include -I ../../char/include -I ../../class1/
include -D_REENTRANT  -c -o Integer.o Integer.c
ar cvrf "libclass1.a" Integer.o ;
a - Integer.o
mkdir -p /export/home/kei/sub/class1/lib;
libclass1.a updated.
$  
この例では静的リンク用にアーカイブファイルを生成している。

いろいろインクルードバスを指定しているのは、sofities projectの各種 sub projectを参照しているものである。今回使用していない io, lang, message, util, x11が含まれているが、これらは別の機会に説明する。

単体テスト (unit test)

Integerクラスを利用する例として単体テストのコード IntegerTest.cを示す。
/* 4.Aug.2012 kei */

#define import_lwd_unit_Assert
#define import_lwd_unit_CUnit

#include <Integer.h>
#include <lwd/unit/Assert.h>
#include <lwd/unit/CUnit.h>

static Integer instance;

void setUp() {
        instance = new_Integer(777);
}

void tearDown() {
        Integer_finalize(instance);
}

void testNewAndFinalize() {
        /* setUp and tearDown are invoked. */
}

void testGetValue() {
        int value = Integer_getValue(instance);

        Assert_equalsInt("A value must be 777.", 777, value);
}

int main(int argc, char** argv) {
        return CUnit_test(argc, argv);
}

sofities projectの test frameworkを使用しているが、フレームワークの使い方は別の機会に説明する。

setUp, tearDownではコンストラクタとデストラクタを呼び出している。

getGetValue関数では getValueを呼び出している。

C++では instance->getValue()のように instanceオブジェクトに対して getValue関数を呼び出すことが理解しやすい記述ができる。Cでは getValue関数に instanceオブジェクトを渡す事しか表現できない。これがオブジェクト指向言語かどうかの違いの1つである。


ついでに、テストの実行の様子も残しておこう。
$ make clean test
cc -g -finstrument-functions -I. -I /export/home/kei/c/core/include -I /export/home/
kei/c/experimental/include -I /export/home/kei/c/io/include -I /export/home/kei/c/lang
/include -I /export/home/kei/c/message/include -I /export/home/kei/c/unit/include -I
 /export/home/kei/c/util/include -I /export/home/kei/c/x11/include -I ../../char/
include -I ../../class1/include  -c -o IntegerTest.o IntegerTest.c
# IntegerTest #
[CUnit] ./IntegerTest: testGetValue
[CUnit] ./IntegerTest: testNewAndFinalize
[SUCCEED] testGetValue in 3(ms)
[SUCCEED] testNewAndFinalize in 2(ms)
successes:    2 (100.0%)
failures:     0 (0.0%)
errors:       0 (0.0%)
total:        2 in 5(ms)
$ 


撚ってる私のハート

2012年7月28日土曜日

構造体(structure)と typedef

C++の classは(可視性のデフォルトを除けば)structと同じである。 C++の structは言語 Cのそれを拡張したものに過ぎない。実際、James Rumbaughの OMT第16章 非オブジェクト指向言語では Cの structを用いてクラスを実現する方法が紹介されている。

ここでは classの実現方法はひとまず置いといて、softies projectに於ける structの使用方法について考察してみる。

Kernighan und Ritchieより

プログラミング言語 Cの 6.9章では、構造体を typedefする例としてつぎのものが示されている。
typedef struct tnode {    /* the basic node */
    char *word;           /* points to the text */
    int count;            /* number of occurrences */
    struct tnode *left    /* left child */
    struct tnode *right;  /* right child */
} TREENODE, *TREEPTR;
このように、typdefと同時に structを定義する場合について考える。

もう少し簡単例を示す。
typedef struct Type {
    Type* child;
} Type;

typedefと struct定義を 1つの分で記述するとすっきりするのだが、自己参照(あるいは循環参照)する場面では、定義が完結していないため内部で typedefした結果を使用することができない。typedefと structを 2つの文で定義することで解決される。
typedef struct Type Type;
struct Type {
    Type* child;
};

さすがに最近はこのようなコードを示しても不思議がられる事は無いが、90年代にはしばしば「ビルドが通るか?」と疑問が投げかけられ、そのたびに説明が必要だった。

疑問の1つ目は、structの名前と typedefする名前がどちらも Typeで良いのか?というものであった。タグをつけるときには Type_tのようにするが、ここでもそうしなければならないという主張であった。 言語 Cでは両者が一緒の名前でも問題はない。 struct Typeと Typeを使い分けなければならない場面は明確で紛らわしくはならないし、別々の名前を考えるほうが手間が生じるため、両者は一緒にしておいたほうが楽である。

2つ目は、struct定義よりも先に typedefできるのか?というものである。 K&Rの 6.9では typedefが「宣言」と書かれていることから判るように、定義は不要である。

そして3つ目は、循環参照する設計は悪い!というものである。 しかし、オブジェクトを分析、設計すると循環するのが自然なものに遭遇する。 GoFが浸透してからは Composite Patternと言えば納得してもらえるようになった。

ポインタも含めてしまおう

オブジェクトを mallocにより heapから割り当てることが多いため、いちいち Type*のようにポインタであることを明示しなくとも、Typeで済ませたい。
typdef struct Type* Type;    /* pointer included */

struct Typeと書かなければならないのはそれを定義するときと sizeof演算子で構造体の(ポインタではなく本体の)サイズを求めるときくらいだから、このように、* も typedefの中に含めてしまえばすっきりする。

C++との互換

softies projectは言語 Cのみを対象としていて、C++との相互利用は原則として考慮されていない。しかし、softiesのテストフレームワーク CUnit packageは CppUnitよりも便利かも(手前味噌)と感じたので、自動車業界での組み込み系 C++プロジェクト内で実際に使ってみた。すると当然ながら Cと C++の違いによる問題が幾つか表面化したのだが、typedefでは上述の typedef struct Type* Type;のように構造体名と typedefの名前を一緒にできないことが判明した。 C++からもアクセスする用途では、ちょっと癪に障るが、
typedef struct Type_t* Type;   /* when the use is required from C++ */
のように両者の名前を変えるのがよい。

幸い、CUnit packageではこのようにしなくとも回避することができたのと、softies projectの CUnit以外の成果を C++から使用する意義がない(オブジェクト指向言語であるC++はその真似事をする必要がないのと、専用のライブラリが充実している)ため、暫くはこの回避策は必要なさそうだ。

このままで挿れたら♥ って思う瞬間まで

2012年7月26日木曜日

命名規則 (naming convention)

softies projectの使用言語は Cであるが、命名規則は Kernighan und Ritchieの伝統を基礎に、オブジェクト指向に対応するためのいくつかの制約と拡張を試みている。


基本原則

K&Rに掲載されている典型的な変数名、関数名を次に示す。
  1. line
  2. getword
  3. day_of_year
  4. op2
  5. _iob
これらは英小文字と下線'_'、2文字目以降には数字を使用する。1つの名前が 2つ以上の単語で構成される場合は空白で区切ることができないため、単語を続けて記述する方法と下線'_'で繋ぐ方法があるが、後者の方が比較的読みやすい。しかし、我々は '_'をパッケージ名やクラス名の区切りとして使用するために通常の単語の区切りとしては使用しないことにした。代わって各単語の先頭を大文字にする CamelCase方式を採用することにした。これは X Window Systemなどで使用されてる。

オブジェクト指向の構成要素を区別しやすくするためにパッケージ名は英小文字と数字のみ、クラス名は英大文字で始める UpperCamelCase、関数や変数名は英小文字で始める LowerCamelCase、そして定数は英大文字と数字そして下線で記述する。


クラス名(class name)

たとえば、Threadクラスのスタックトレース出力を行う関数を表現する場合は次のようになる。
Thread_dumpStack()

_の前は Threadがクラス名(class name)、_の後は dumpStackが関数名(function name)、オブジェクト指向的にいえば、操作名(operation name)あるいはメソッド名(method name)である。

さらに、この Threadクラスが lwd:langパッケージに属する場合は次のようになる。
lwd_lang_Thread_dumpStack()

このように変数名や関数名に接頭辞のごとくクラス名をつけることには訳がある。プログラムの中で名前の衝突を回避しなければならないことがあり、大規模になるほど名称の管理は難しくなる。クラス名や後に述べるパッケージ名をつけることにより、衝突の回避がしやすくなる。たとえば、Streamクラスと Textクラスに各々 read関数を定義されていても良い。

パッケージ名(package name)

パッケージ名(package name)は 1つ以上の名前空間(name space)で構成されている。各々の名前空間は前述のとおり英小文字か数字で表現するため、名前空間は '_'で区切ることができる。

悪い例(bad example)
lwd_Lang_Thead_Dump_Stack

パッケージ名、クラス名、関数名等に各々大文字を使用したり、単語の区切りに '_'を使用してしまうと、どこまでがパッケージ名、クラス名、関数名なのか区別できなくなる。
同様の理由で、名前空間の名称の単語を '_'で区切ったり、変数名や関数名を '_'で始めたり、終えたりすることはしない。


定数(constant)

定数は、#defineて定義される記号名に加え、メモリに配置される const値も、単語を '_'で繋いだ英大文字および数字で表記する。 つぎに示す例は、前述の Threadクラスで定義される最大優先順位を示す名称。
lwd_lang_Thread_MAX_PRIORITY


局所名(private name, local name)

ソースモジュール内でのみ有効な privateな変数、関数の名称はグローバルではないため名称の衝突を心配する必要はない。また、関数内でのみ使用されるローカル変数の名前も同様である。これらはパッケージ名やクラス名を省略してできるだけ単純な名前をつけるのが良い。

例)
dumpStack


補足

これまで説明したとおり、パッケージ名まで表現しようとすると長い名前になる。しかし、これは冗長というわけではない。

K&Rで推奨している 8文字には収まりそうも無い。しかし近代的な処理系であっても名称の長さの上限がなくなったわけではない。255文字に収まるのが適当と思われる。


四川は、まるでレーザービーム

2012年7月15日日曜日

charのサイズ その2

charのサイズのづつき

charを2バイトにするのは実験。普通なら wchar_tを使うべきでしょう。
早速何が起きているか確認。
$ cat literalTest.c
/* 15.Jul.2012 kei */

#include <stdio.h>
#include <stdlib.h>
#include "redefines.h"

int main() {
 char a = 'あ';
 printf("%x\n", a);
 return EXIT_SUCCESS;
}
$ cc -o literalTest literalTest.c
literalTest.c: In function ‘main’:
literalTest.c:8:11: warning: multi-character character constant [-Wmultichar]
literalTest.c:8:2: warning: large integer implicitly truncated to unsigned type
 [-Woverflow]
$ ./literalTest
8182
$ 

実行はできた。でも
$ echo あ | od -tx1
0000000 e3 81 82 0a
0000004
$ 

だから、e3が掛けているのが判る。
UTF-8は Unicodeの交換用外部フォーマットなので 3バイト。ならば、内部表現の UCS2を使ったらどうか。
$ cc -fexec-charset=ucs2 -o literalTest literalTest.c
literalTest.c: In function ‘main’:
literalTest.c:8:11: warning: multi-character character constant [-Wmultichar]
literalTest.c:8:2: warning: large integer implicitly truncated to unsigned type
 [-Woverflow]
literalTest.c:14:0: internal compiler error: character 0xa is not unibyte in
 execution character set
Please submit a full bug report,
with preprocessed source if appropriate.
See <http://gcc.gnu.org/bugs.html> for instructions.
$ 

おお今度は警告だけでは済まなかった。 gccの組み込み printfがエラーになったのかも。通常のライブラリ関数にしてみる。
$ cc -fno-builtin-printf -fexec-charset=ucs2 -o literalTest literalTest.c
literalTest.c: In function ‘main’:
literalTest.c:8:11: warning: multi-character character constant [-Wmultichar]
literalTest.c:8:2: warning: large integer implicitly truncated to unsigned type
 [-Woverflow]
$ ./literalTest
��$ 

今度は実行までできたが、出力は文字化け。 UTF-8な環境で UCS2を吐き出したのだから当たり前か。
とりあえず確認用に 16進ダンプを書いてみる。
$ cat literalTest.c
/* 15.Jul.2012 kei */

#include <stdio.h>
#include <stdlib.h>
#include "redefines.h"

void lineFeed() {
 byte b = (byte)0xa;
 write(fileno(stdout), &b, 1);
}

void dumpDigit(int d) {
 byte b = (byte)((d < 10) ? (d + 0x30) : (d + 0x61));
 write(fileno(stdout), &b, 1);
}

void dumpByte(int c) {
 int d1 = (c >> 4) & 0xf;
 int d2 = c & 0xf;

 dumpDigit(d1);
 dumpDigit(d2);
}

void dump(char c) {
 int c1 = c >> 8;
 int c2 = c & 0xff;

 dumpByte(c1);
 dumpByte(c2);
 lineFeed();
}

int main() {
 char a = 'あ';

 dump(a);

 return EXIT_SUCCESS;
}
$ cc -fno-builtin-printf -fexec-charset=ucs2 -o literalTest literalTest.c
literalTest.c: In function ‘main’:
literalTest.c:35:11: warning: multi-character character constant [-Wmultichar]
literalTest.c:35:2: warning: large integer implicitly truncated to unsigned type
 [-Woverflow]
$ ./literalTest
4230
$ 

'あ'は UCS2で 0x3042なので、データは大丈夫ようだ。

実例は示さないが、UCS2を使った場合いくつか注意点がある。
ASCIIの範囲でも上位バイトに 0x00が入るため、それなりのprintfでないとすぐに文字列が終端してしまい、なにも表示できない。
wprintfと Lつきのリテラルで英数字を表示することはできるが、漢字などはうまく表示できない。

UCS2な環境にするか、UCS2を扱える printfにするか、printf呼ぶ前に UTF-8に戻す必要があるだろう。

いづれにしても、通常用途ではお勧めできない使い方。

半年で気がついたらぁ

2012年7月12日木曜日

charのサイズ

softiesプロジェクトのために、char を2バイトにしてみる。


$ gcc --version
gcc (GCC) 4.6.0
Copyright (C) 2011 Free Software Foundation, Inc.
This is free software; see the source for copying conditions.  There is NO
warranty; not even for MERCHANTABILITY or FITNESS FOR A PARTICULAR PURPOSE.

$ cat redefinesTest.c
/* 12.Jul.2012 kei */

#include <stdio.h>
#include <stdlib.h>
#include <redefines.h>

int main() {
 printf("sizeof byte: %d \n", sizeof(byte));
 printf("sizeof char: %d \n", sizeof(char));

 byte b = 0x2222;
 char c = 0x3034;
 printf("b: %x \n", b);
 printf("c: %x \n", c);

 return EXIT_SUCCESS;
}
$ cc -o redefinesTest -I. redefinesTest.c
redefinesTest.c: In function ‘main’:
redefinesTest.c:13:2: warning: overflow in implicit constant conversion [-Woverflow]
$ ./redefinesTest
sizeof byte: 1 
sizeof char: 2 
b: 22 
c: 3034 
$  

よしよし、ちゃんと警告も出ている。でも include順をまちがうと、大変なことになりそうだな。

多くの文字が 3バイトである UTF-8だと、 c = 'あ'; のようなリテラルの使用はうまくいかない。

愛の照明は?